It offers:
- Basic image enhancements.
- Optical character recognition.
- An interface to populate metadata.
- The ability to scan one document at a time to a single destination.
Scanning Documents in Basic Mode
- In your Laserfiche repository, browse to the folder you want to scan documents into.
- Open Laserfiche Scanning by clicking the Scan button
 from the toolbar.
- If you do not have Laserfiche Scanning installed, you will see the Install Laserfiche Scanning download page. Click on the Laserfiche Scanning button to download and run the Laserfiche Scanning installation.
Note: When you attempt to open scanning from the Laserfiche web client for the first time, you will receive a warning message asking you to verify that a valid web service is launching Laserfiche Scanning. This mechanism protects you from bad links attempting to load scanning. Please verify that the displayed URL is the correct URL for your the Laserfiche web client server. If you select Yes, the Laserfiche web client will remember your choice for the displayed URL and will not display this warning message the next time you load web scanning.
- Select Basic mode.
- Select a scanning source. Only sources you have purchased and installed will be available to choose from.
- Configure your scan source.
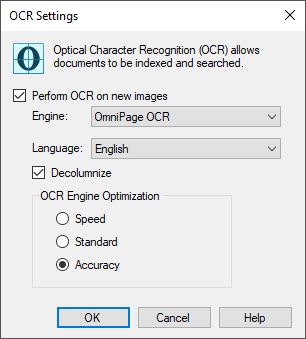
- To generate text from scanned documents, select OCR Settings from the toolbar. This image process converts text in a scanned image into text that can be edited on a computer. This process is called optical character recognition (OCR). The OCR engine used by Laserfiche Scanning is OmniPage OCR. It is automatically installed with Laserfiche Scanning.
OCR works best on clearly typed documents. Extracted text is sent with the image to a Laserfiche repository. It will be available for text searches. In the
 OCR Settings dialog box, configure the following:
 - To enable OCR, select Perform OCR on new images.
- Select a language to determine which type of characters will be preferred.
- Select Decolumnize to remove column formatting from scanned images. If this option is disabled, columns will determine the vertical order in which text appears in a scanned document's text file.
- In the Optimization Priority option, select Speed, Standard or Accuracy.
- Click the Enhancements button
 from the toolbar to configure if and how image enhancements and processes will be applied to the images you scan. Enhancements can improve the quality of OCR, indexing, and searching for scanned documents. Learn more about Enhancements and Processes.
 - Click the Start Scanning button
 from the toolbar.
 - Once scanning is complete, specify the name, template, field values, tags, and volume to be associated with the document in the Document Properties pane.
- Review scanned images and/or generated text. Use the toolbars to navigate and rotate images.
- Open the page you want to rescan in the display pane. You can only rescan one page at a time.
- Place the corresponding page in your scanner.
- Select Rescan from the toolbar to begin scanning. Any OCR and/or image enhancement processes assigned to the previous image will be applied. The new image will appear in place of the previous image.
- Open the page you want to delete in the display pane.
- Under Edit in the menu bar, select Delete Page Alternatively, to delete all pages in the document, select Delete all pages.
- Store the document in a Laserfiche repository using one of the following methods:
- Select Done from the toolbar to store the document in the folder you opened Laserfiche Scanning from. Laserfiche Scanning will close after the document is stored.
- Select New Document from the toolbar to store the document without closing Laserfiche Scanning, which will let you scan an additional document.
Note: The Laserfiche Windows client will only prompt you to select a scanning mode if the Laserfiche Windows client's Scan Mode option is selected under Tools, Options, Reset, Prompts. If this option is not selected, scanning will always open in the mode most recently used.
Note: OCR is a resource-intensive process which can be dramatically affected by poor quality images, improperly scanned images, and/or a machine's processing power and RAM.
Note: Default document names are inherited from the Autoname setting in the Laserfiche Windows client. To edit this preference, select Tools, Options, Autoname.
Tip: You can choose from six display modes for the Display Pane.
If you are unsatisfied with an image due to a scanning error, rescan it. The rescan feature can only be used with images that have not yet been stored in a Laserfiche repository and is not recommended for the Universal Capture scan source.
To delete images
Note: Errors encountered during document storage are displayed in the Output Log Pane. Common errors include invalid field data and insufficient privileges for creating an entry in the destination specified.
Related pages
